vanilla cake
|
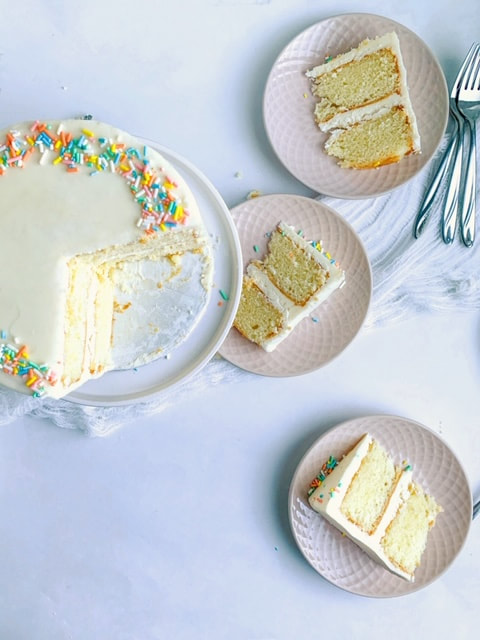
VANILLA CAKE
This classic flavor never goes out of style. It's delicious on it's own or as a base for additional flavors. Think... frosting, ganache, whipped cream and fresh fruit, YUM! This is my favorite vanilla cake recipe for its fluffy texture, deep vanilla flavor and tender crumb. I've included some tips and insight into the process, so take a minute to read for the best results. HOW MUCH CAKE? The recipe fits two 8" round pans, two 9" round pans, two 8"x8" square pans or one 9"x13" rectangle pan. If you like thick cake layers, this batter will bake up just right. If you prefer thinner torte layers, the cakes can be sliced horizontally with a large serrated knife after a little chill time in the freezer. Freezing the cake a bit ensures the cake can withstand the knife's pressure. If you try cutting a hot cake, you'll be left with a hot mess. More about freezing in the next section. WHAT'S YOUR CAKE STYLE? If you want to keep it simple, you can serve the cake straight out of the pan. If you decide to be fancy and layer it up with frosting, you'll need to remove the cake from the pan. No matter what type of pan you use, make sure to grease the pan generously using Pan Release!!! (You can find a recipe under BAKE section of my site). If you enjoy baking, consider keeping a roll of parchment paper on hand. The extra step of parchment paper to fit the bottom of your pan is a game changer. You'll never have trouble removing baked good from the pan again! One roll will last a long time and once you try it, you won't miss the anxiety of flipping your gorgeous cake out of the pan only to see half still stuck to the bottom. Decide before you start if you want to keep it simple or be fancy before you get started. If you choose to make a layered cake, take your time! Bake cake layers a day in advance, this will save you time and energy. Once the cake is out of the oven let it cool for 10-15 minutes then run a butter knife around the edges and flip onto a piece of plastic wrap. Wrap it up and freeze it until you are ready to assemble. This locks in moisture and firms up the layer so you can handle it easily when assembling with frosting or filling of your choice. WHICH PAN? Although non-stick pans sound good in theory, they aren't the best option for baking. Neither are dark coated pans. The edges of your baked goods will brown too quickly before the center is fully baked. Anodized aluminum pans are used by professionals for the most even heat distribution (popular brands are Fat Daddio and Wilton). Other options for home bakers are glass baking dishes and even disposable aluminum pans will do the trick. the depth of your pans should range from 2-3 inches, pans more shallow than 2" and risk batter overflowing all over your oven. No one wants to clean batter up, so check first! WHY ROOM TEMPERATURE? This recipe calls for room temperature ingredients, so you'll need to get your butter, eggs and buttermilk out of the fridge 1-2 hours before you start mixing. When all the batter ingredients are close in temperature, the result is a smooth airy batter. A drastic difference in ingredient temperature means a lumpy batter that is dense and most likely over mixed. No matter how hard you try, cold butter straight from the fridge will not mix up well, in fact you might even end up damaging your mixer. To speed up the process, you can cut the butter up into small pieces to reach room temperature quicker. For the best results, room temp ingredients are the way to go.
0 Comments
|
ArchivesCategories |